ProPresenter
Preface
ProPresenter, by Renewed Vision is the industry leading Church Presentation Software. It is chock-full of features and functionality, and can be quite advanced.
This guide will not recreate Renewed Vision’s own documentation; not every aspect will be covered. Rather, the focus will be on the parts of the software that are actually used in setting up and running services at Village.
Setting Up Service
The Short Version
- Add the week’s songs
- Add or remove parts of services as needed (Communion, Bible verses)
- Put in the week’s sermon notes
Adding Songs to the Playlist
Most weeks, you’ll be at the worship team’s rehearsal earlier on Thursday to run through the song list for that Sunday. The song list should be available on Planning Center, where you can also find the specific arrangements being used that week.
Make sure that each song from Planning Center is in the Sunday Service playlist. The order on Planning Center will match the order the songs will be played on Sunday.
Make sure there is Set for Worship Macro on the first slide of the song!
Make sure there is a blank slide with Worship Credits on the last slide!
Set for Worship
This macro is crucial in ensuring that the song lyrics will appear appropriately both in the sanctuary and on the streem, and that the worship team sees the lyrics on the stage display.
Refer to Audience Looks and Macros for more information.
Credits
As part of our streaming setup, we need the song credits to appear at the end of every song. ProPresenter does this automatically, however: the Mac version of ProPresenter layers the license information underneath the active slide theme.
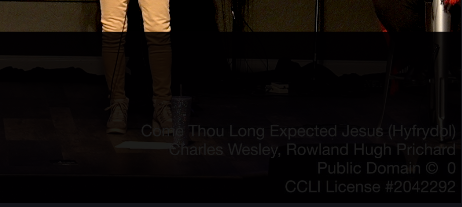
This means that on the stream, the license information will be obscured by the black rectangle meant to help it stand out.
To counter this, the last slide of the song should have the Credits macro on it.
Working With Placeholders
The standard playlist uses placeholders for the songs. If the previous week’s songs are still in the playlist, simply right-click and select Unlink.
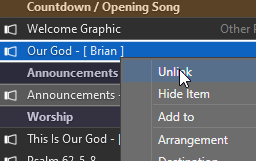
Once the placeholder is open (its name will default back to a generic “Song 1”, etc), you can find it in the main window. On the far right side of the placeholder title bar, you’ll have three (five, really) options for filling the placeholder with content:
- Create a new presentation from scratch
- Import a new presentation from a file
- Search for a matching presentation
- Search existing libraries
- Search on SongSelect to import new presentation
- Search on MultiTracks to import new presentation
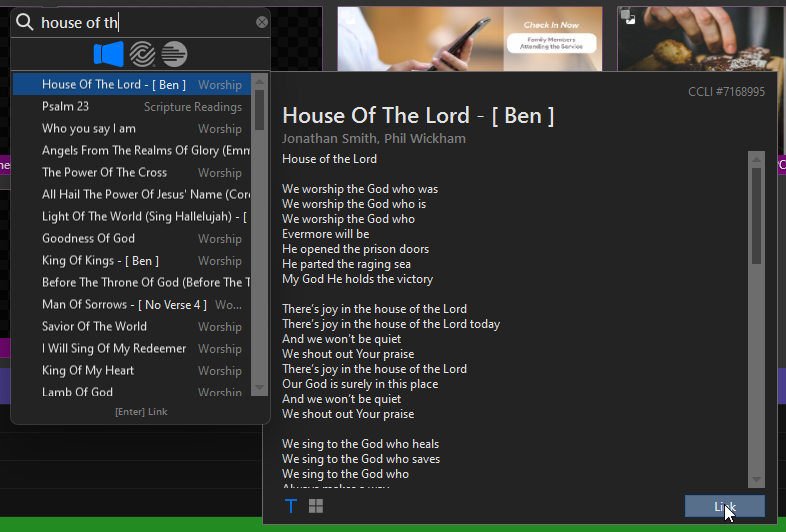
Most of the time, you’ll simply find the item in an existing library. Start searching for a song title, then click on it from the list. If the preview that pops up is the correct song, click Link.
Adjusting Song Arrangements
Different worship leaders may play the same song in different ways. Or sometimes, a song is shortened to serve as a closing song, etc. As discussed in the ProPresenter Components section, these are handled using arrangements.
To open up the arrangement tools, click the corresponding button in the song’s heading in the main window.

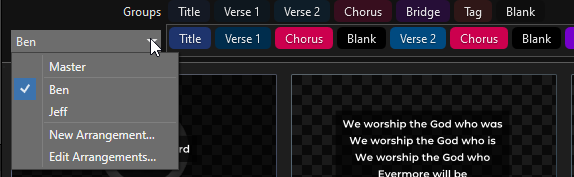
With the arrangement tools open, you’ll see the Master bank of song parts at the top. Below that, a dropdown to select an arrangement, and the sequence of parts that the arrangment uses. Most songs will already have an arrangement saved, usually under the name of the worship leader.
The arrangement bar is drag-and-drop. To add parts, drag from the upper “bank” and drop into the arrangement order. Parts of the arrangement can be moved around at will until match what is needed.
Planning Center is great, but arrangements can and do change even up to Sunday morning. Be sure to pay close attention during rehearsals to make sure that the arrangement matches what the worship team is doing!
To remove a part, hover your mouse over the item in the arrangement bar and an X will appear. Click it to remove.
When adjusting an arrangement, do not simply right-click a slide and choose “Delete”. This will remove that slide from the song entirely, not just from the current arrangement.
New Arrangements
On occasion, you won’t have an arrangement in ProPresenter that matches what the worship leader wants. Rather than edit an existing arrangement, use the dropdown menu pictured earlier in Figure 1 and choose either Edit Arrangements… or New Arrangement…. Be sure to name it something descriptive and helpful if it’s a non-standard arrangement, such as Jeff - Shortened Closer, or Ben - Extra Bridge.
Most of the time, a new arrangement is going to use an existing one as its “jumping off” point, as when a song is shortened for a closer. In the Edit Arrangements window, you can select an existing arrangement and Duplicate it, then pare it down from there.
Other Parts of Service
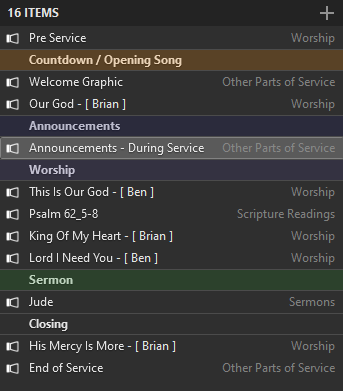
Another feature of playlists is that individual items can be hidden without removing them. Simply right-click an item in the playlist and select Hide to do so. These items are indicated at the bottom of the playlist panel:

Clicking on that message will give you the option to unhide any or all of the items.
The most common use of this feature is for scripture readings and communion. Neither happen every single week, but they happen with enough frequency that it’s useful to keep them close at hand.
Here are the different parts of service that may be added to the order on a given week:
Communion
On Communion Sunday, unhide this part of service. You may need to drag the placeholder to the appropriate spot in the order of service.
Communion is simple. We show a text overlay prop with the word “communion” on it, which will show over the stream camera as well as on the sanctuary screens.
In the sanctuary, there’s a simple background with an image of a communion cup.
Baptism
Baptisms start similar to Communion: text on all screens, and a nice background in the sanctuary.
Often, though, the people getting baptised will have recorded a statement of faith or testimony ahead of time, and we are to display these prior to that person being baptised in person.
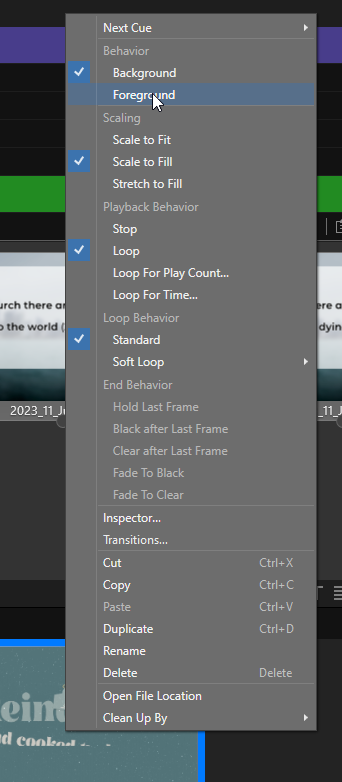
Add these videos to the Baptism slides just like an announcement video:
- Behavior: foreground
- Playback: stop
- End: fade to clear
Pastor Steve or an elder may give you a verbal cue for this video, or they’ll tell you ahead of time when to play it. If not, just default to playing it as the person enters the baptismal font.
Scripture Reading
If the worship leader adds a scripture, unhide this item and move it into the right position.
Our Scripture Readings library grows as we go. Always do a search to see if the reading is already there. If it isn’t, click the Bible icon in the main toolbar.
You can search for specific verses here and quickly add them to the library, after which you can link the new item to the placeholder.
When you add a new scripture reading, be sure to add the corresponding Scripture Reading macro to the first slide! This will ensure that the verse appears nice and big for everyone on stage, in the audience, or online.
Preparing the Sermon
Find the Notes
AV team members should be on the email list that gets the sermon notes. Please ask if that’s not the case, and we can get you added. You can also open up Chrome and use the Village Bible Church Plano Campus AV profile, then go to Gmail. This is a shared user account that is already on the email list, so it gets the sermon notes sent to it as well.
Props and Media
Even up to the final minutes before service, Steve likes to request different media to be added to the sermon, such as:
- Audio taken from a YouTube video
- A YouTube video clip
- An image
Depending on what he needs, you may need to use one of the various utilities available.
Many of these things are meant to be interspersed among the sermon outline. You may certainly create separate slides for these things, but you may also wish to add these items as props, which can be turned on and off without interrupting the current slide.
Simple Update
Most weeks, you’ll just be changing the title and the bullet points, but the bumper, backgrounds, etc. will remain the same.
With the sermon selected, switch to the Edit view from the main toolbar.

You can also right-click any slide and get into the editor from that menu.
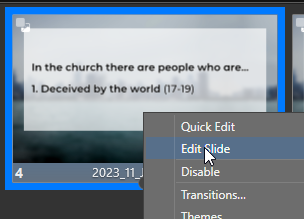
In the editor, just double click on a text box to activate it, then type or copy and paste as needed.
Slide Build
A build is ProPresenter’s way of having parts of a slide appear / disappear incrementally. We use it for sermon notes.
A build can be by underline, or by bullet / whole line. It’s up to you which you want. As you add / remove items from the build, you should see the Build Order update accordingly in the panel on the right.
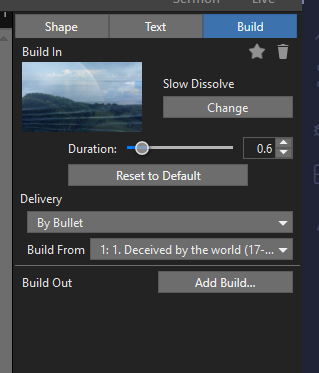
In the past, the build shown on the edit page did not carry over to the actual presentation somehow, resulting in some lines / blanks not appearing at all!
Always test out the slides before service starts!
New Sermon Series
When a new sermon series is beginning, you’ll have a bit more to do than just editing text.
- Sermon Bumper
- Title Screen
- Background
- Possible style adjustments
Items 1 - 3 should all be in the Dropbox folder. If the new series isn’t there, you may need to adjust the Dropbox sync settings first.
Once the new media items are in ProPresenter’s media bin, you can drag and drop them onto the right slides in the sermon.
Sermon Bumper
The sermon bumper needs to transition directly to the title screen. When ProPresenter imports video files, it automatically assumes they will be looping background videos. Before adding the sermon bumper, right-click it in the media bin and set the following:
- Behavior: Foreground
- Playback Behavior: Stop
- End Behavior: Fade To Clear
If you drag and drop the new bumper video onto the old one, it should keep the same settings. But for the record, the bumper slide needs:
- Macro: Video
- Go To Next Timer: 0s
The outline slides should have the Sermon macro on them.
Running Sunday Service
Before Service Starts
The first item in the order of service is the Announcements Loop. This will cycle through all the announcements slides, automatically changing every 10 seconds.
In order for this to work properly, make sure of the following things:
- The Audience Look needs to be set to Announcements.
- The Target of the announcements item needs to be set to Announcements. 1
- Click any slide in the Announcements Loop to start the loop.
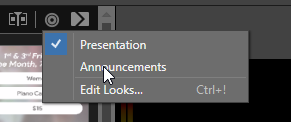
Announcements will loop and repeat all through service. As long as the Announcements source is disabled in the active Audience Look, you won’t see them. See the Audience Looks section for more detailed information.
Five Minute Timer
Five minutes before service starts, a timer will begin counting down on the stream output, while announcements will continue to play in the sanctuary.
At the end of the timer, the worship team should be on the stage. A “welcome” message will show on the screen.
Calendar Events
Thanks to ProPresenter’s Calendar options, the five minute timer slide should trigger automatically.
Worship
Once the timer ends, we move into the worship songs. You should have already set up the songs with their arrangements, so this is as simple as advancing through the slides.
Tips!
Advancing Slides
When singing, the congregation will have the last few words of a slide already in their mind. But they don’t get to see the next slide!
Try to advance to the next slide with enough time for folks to register the change and see the next set of words, even if it cuts off the preceding slide by a word or two.
Song Credits
The final slide will show credits for the song. These don’t really need to be displayed for that long, though. If a song has a long outtro, you can click “clear slide” after a couple of seconds.
Announcements / Sermon Bumper
As of 2024, announcements are now being done through a pre-recorded video message, and follows worship. Set up properly, you can just trigger the announcements video and it will flow into the sermon bumper when it’s finished.
Lights, Camera
The announcements and sermon bumper are a transition period for the stage and our stream. While it is running, do the following:
- Dim the stage lights (the 4th slider from the left on the light board)
- Zoom the camera in on the pulpit
- In the final seconds of the bumper slowly fade the stage lights back up to about 8.
Don’t zoom in too close on the pulpit. Pastor Steve likes to move around as he speaks, so you will want enough room for him to step to either side (though he tends more to the left) of the pulpit.
Sermon
The sermon bumper will automatically advance to the sermon series background. Stay on this slide for about 30 seconds before showing the title.
When Village prepares the sermon video from our stream recording, they like to have a clear frame to use as the video thumbnail.
After the brief pause, or when Steve mentions the title / scripture, advance to the title slide of the sermon. The rest of the outline may be single points, or a series of underlines that get progressively revealed. As with worship, you just need to pay attention and advance slides as needed.
Closing
There is usually a single song after the sermon ends. Nothing special, just run it as with other worship songs.
Once the song ends, we put a “goodbye” message on the screen for a minute or two.
Ending First Service
When another service follows the one that just ended, be ready to cut back to the announcements loop. If the announcements loop is still running, there is a slide at the very end of the playlist to do this for you. Otherwise, just scroll to the top and trigger it that way.
ProPresenter Components
Songs
Master Slide Bank
Every song has a Master slide bank, consisting of every part of the song that might show up on screen. The different slides are collected into Groups, which are labeled things like Verse 1, Chorus, etc.
The Master arrangement is not the order the slides will be performed in! That’s handled with Arrangements.
Arrangements
Arrangements are how we actually build out the songs as they will be performed, like “verse, chorus, verse, chorus, chorus”. To put it simply, an arrangement is just a series of placeholders that pull from the master slide bank. The placeholders can be added, removed, and rearranged as needed.
The song will still only have a single “copy” of each slide group, but an arrangement can have as many placeholders as needed.
You can access a song’s arrangements from the song’s title bar:
From there, you can see the slide bank and the current arrangement. Change arrangements from the dropdown. Drag and drop items from the upper bar into the lower bar to build your arrangement.
Libraries
Libraries are just collections of Presentations, to help keep things organized. Songs go in Worship, Bible verses in Scripture Readings, things like that.
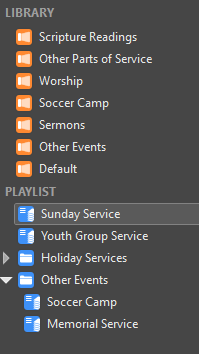
Playlists
A playlist is a series of items such as presentations in a particular order. A playlist is what actually represents the order of service. For the most part, we will always be using the Sunday Service playlist and modifying it from week to week. Special events and holiday services differ too much, though, and get their own playlists.
Playlists are made of the following items:
- Presentations (along with a selected arrangement)
- Headers: these are just colored, labelled bars to differentiate between different sections of the playlist
- Placeholders: these hold the place of a presentation, and specific items can be swapped in and out without changing the order of the playlist
- Media Items: you can have a media item like a video or image triggered directly from the playlist. Don’t do this. You will have much more control over how the media displays, plays, etc., if you add it to a slide item in a presentation.
Props
A Prop in ProPresenter is a slide that is independent of any presentation or playlist. When triggered, a prop will display over the top of everything else on the screen until it is deactivated. Note that this does not affect the other items on-screen!
What are props for?
The most common use is when there are images or videos being shown as part of a sermon illustration. After the media has been shown, the sermon would often go back to whatever slide was shown before. Rather than adding duplicate slides, you can just trigger the image from a prop, turn it off, and the outline is where you left it.
“Long Props”
Sometimes, an image from the sermon illustration will stay on screen and be talked about at length (longer than 10 seconds). This is fine in the sanctuary, but on the stream, it can be a bit awkward to show a single image for that long.
There are a few ways to address this.
Media Slide with a Prop
- Add the image to the sermon as its own slide.
- Add the image as a prop to the same slide.
- Set the prop to auto-clear after 5 seconds.
This way, the media slide stays up for as long as necessary, but the stream, which does not show media backgrounds, will go back to the camera when the prop clears. Since the prop and the background are the same image, people in the sanctuary won’t notice anything.
It does involve creating duplicate slides, but it is consistent and it works.
Turn off the Stream input on the Streaming Computer
In OBS, there are scenes for each camera that omit the stream. On the streaming computer, you can transition between the Close Camera scene to the Close Camera (No Stream) scene, and the prop will fade out.
Just don’t forget to transition back to the regular feed before the next prop or outline point comes up!
Audience Looks
Audience Looks control what is visible on a given screen. For instance, we might want to have the camera showing on one screen, but a background image on the other.
Looks also allow for Theme overrides. On the stream output, for instance, the lyrics cannot be in the middle of the screen. A theme override can force the lyrics slides to display in a different way, but only on that particular output.
Switching Looks
Manually
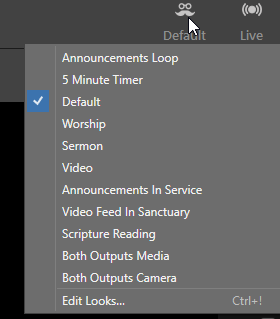
In the upper-right of the application, you can find the Audience Look icon. Clicking the icon will open a menu of all the available Looks.
Click on any look in the list to switch to it.
From this menu, you can also open the Edit Looks
Automatically
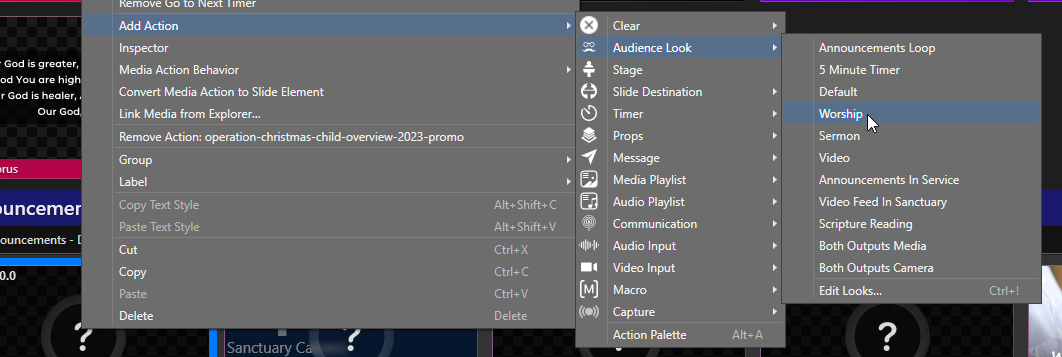
You don’t need to manually switch looks, though. By adding a Slide Action to a song, sermon, etc., we can have the look change automatically. But we can take this a step further, even, by using macros.
Configured Looks
These are the Audience Looks currently configured on the AV machine.
Sermon
Sermons are very similar to worship, except that the sermon outline doesn’t need to take up as much space, so it uses a different theme. It also does not enforce a theme override on the sanctuary output, in case the sermon notes need to be more flexible.
- Sanctuary: Slides and Media
- Stream: Slides with Lower Third → Sermon slide theme override, and VBC Logo
Video
When showing a video, such as during a sermon bumper or announcements videos, both outputs need to show the media.
- Sanctuary: Media
- Stream: Media with VBC Logo
Announcements in Service
During in-service announcements, we like to show the slides that the person on the stage is talking about. On the stream, however, this can be a bit awkward, as the slide would completely cover the video feed. This look uses a particular theme override to bring the media into a smaller portion of the screen, allowing the camera feed to still show around it.
- Sanctuary: Slide and Media
- Stream: Slide with Lower Third → Announcements theme override, and VBC Logo
Scripture Reading
When a scripture verse is being read in service, the verse takes up most of screen, with a bit of the background showing. This look puts the verse over the media or camera, but with no theme overrides.
- Sanctuary: Slide and Media
- Stream: Slide and VBC Logo
Communion
Shows the “communion” text prop in the sanctuary, but not on the stream.
- Sanctuary: Media and Props
- Stream: VBC Logo
Worship Credits
A workaround to get our CCLI information to show up on the stream. Only meant to be shown on the final slide of a song.
- Sanctuary: Media only
- Stream: Text, no theme override
Macros
Macros are a way to “bundle” multiple actions into one. You can also edit macros in the side menu, and anywhere the macro is being used, it will automatically pick up the changes you make.
Configured Macros
- Set for worship
- Audience look: worship
- Stage screen: worship
- Clear props
- Set for sermon
- Audience look: sermon
- Stage screen: sermon
- Clear props
- Video / Sermon Bumper
- Audience look: video
- Announcements loop
- Audience look: announcements loop
- Clear props
- Default view
- Clear props
- Clear slides
- Audience look: default
- Communion
- Audience look: communion
- Clear props
- Clear slides
- Scripture reading
- Audience look: scripture reading
- Stage view: scripture mirror
- Countdown
- Activates 5-minute timer
- Audience look: timer
- Stage view: timer
- Worship Credits
- Audience look: credits
- Stage screen: worship
- Clear props
Program Configuration
This section details the technical setup of ProPresenter. If we ever need to run service from another machine or get a new computer, you can refer to these details to make sure that the new setup matches what we’ve been using.
Audio
Sound Board
The AV computer sends sound to the board using a standard 3.5mm audio cable. This audio output is labeled Realtek. All computer media (sermon bumper, etc) plays over this connection.
As of March 2024, streaming is done from the second computer. No audio comes back into the computer from the board.
Screens / Outputs
ProPresenter is set up with 3 different outputs:
- Audience: This output goes to the two screens up at the front of the sanctuary
- Stage: This is the single screen in the back
- Stream: Lyrics and media are sent over NDI (Network Display Interface) for the stream computer to pick up and merge with the video.
All outputs are 1920 by 1080 resolution.
Footnotes
ProPresenter should remember this setting, but double-check it anyway!↩︎